Cuddle Worthy Neck Pillow
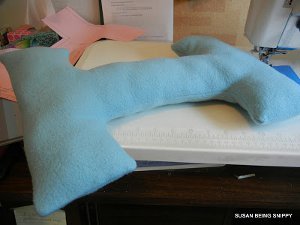
Great for holiday traveling or long plane, train, or automobile rides, this Cuddle Worthy Neck Pillow is a simple project that sewists of all skill levels can make. With a simple pattern and some cozy felt fabric, you can have your own cuddle worthy pillow in no time! These pillows are so fun and easy to make that you may find it hard to stop after just one! Make one for all your friends and family this holiday season and make traveling easy and comfy for everyone you love!

Materials:
- Polar fleece or other 'comfy fabric', enough to be able to cut out 2 rectangles that are about 18" x 14"
- Thread
- Pillow stuffing, or left over bits of quilt batting
- Sewing machine
- The pattern you make yourself - a large piece of paper, use a newspaper page if you need to and mark the lines with a marker that doesn't bleed through, or put layers of paper underneath so you don't leave marks on your table
Instructions:
-
Make the pattern. Refer to the photo below. 1st mark a rectangle that measures 16" long x 12" wide.

-
Mark a seam allowance of 1/2 inch all around your rectangle (my pattern doesn't show the end seam allowance on this one so you just have to take my word).
-
I fold the paper in half long ways and short ways, so you can use the crease to measure from. Use your ruler and draw a line 2 inches from each side of the folds, so that now it looks like a 'dog bone'. Check the shape you have made so that it looks like my drawn pattern.
-
On the part of the pattern that forms the " |_| " draw your seam allowance so that the log or centre 'bone' part stays at 4 inches wide and 8 inches long.
-
Your lines don't have to be perfect, I find that this size works very well for me. If you are a bigger person you might want to make the length a bit longer, you might make the centre "bone" so that it finishes at 9 inches, but my suggestion is to start out with the standard then experiment on later tries.
-
Pin your pattern to your fabric. I like polar fleece because it is easy to sew and is soft and not scratchy at all.

-
Cut your fabric in the pattern shape. Unpin from your pattern and make sure that the right sides of the fabric are facing each other.
-
Now, I like to make a marking dot at each corner so I know when to turn the corner and still keep the 1/2 inch seam allowance.
-
Start at the centre of one end of the 'dog bone' use one or two back stitches and sew all the way around making sure to maintain a 1/2 inch seam allowance. End so that you leave about a 4 or 5 inch opening.

-
Snip the outside corners so they don't bulk up, and snip the inside corners so that they turn smoothly, don't snip into your stitched line!

-
Turn right side out.

-
Find your prefered stuffing or batting.

-
A bit at a time, and being patient, push stuffing into the furthest corners of the pillow, but don't make it really firm, just squishy.

-
Last bit, hand sew the opening closed.

- Lay down and test it out.
Read NextSmall Hooded Poncho Pattern
Your Recently Viewed Projects
paver2
Jun 15, 2017
That's interesting. I wonder if it would work for sleeping in bed? That's where I really need it. Maybe with a slightly bigger center piece? I might give this a try and if it doesn't work for bed, I will save it for car trips or give it to someone who travels more than me.
Weberme
Aug 08, 2016
A great way to make a small comfy pillow for traveling instead of keeping the big ones for long car rides for vacation and small enough to keep in car for those drives around town when little ones get tired. A great simple tutorial to make one for all the grands and big kids a like. A great idea for flying too. How about adding some essential oils like lavender for calming the nerves or a good sleep plus it will keep them smelling good.
Report Inappropriate Comment
Are you sure you would like to report this comment? It will be flagged for our moderators to take action.
Thank you for taking the time to improve the content on our site.

