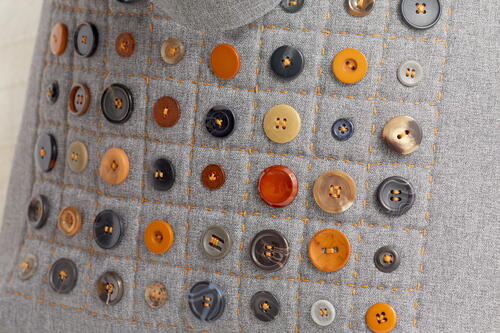
Button and Big Stitch Tote
Stay organized and stylish with this beautiful tote sewing pattern!

Stash yarn, craft supplies, everyday items, and more in this beautiful button tote! We love the unique design of this sewing project. It's sure to earn compliments from those around you. And on top of that, it's a really practical project to make as well. Upgrade one of your older totes or purses to this lovely project, and take pride in knowing that you crafted it yourself!
Project Notes: "Whether you’re showcasing a collection of your grandmother’s buttons, or you purchased them new, this tote is the ideal way to show them off. Each one is framed with bold, contrasting hand stitching. Use one of Coats & Clark’s heavier threads such as Jeans Thread, Dual Duty XP Heavy or Button and Craft thread for a bold accent."
PLUS! Enter to win the Coats & Clark 32 Spool Thread Assortment Giveaway as part of our 10 Days of Thanks Giveaway as well as our 10 Days Grand Prize!
NotesFinished size (at top): 17” x 14 ½” (43.18cm x 36.83cm)
Sewn byBoth Hand and Machine

Materials List
- Coats & Clark™ Jeans Thread, color 8145 Red Orange
- Coats & Clark™ Dual Duty XP™ All-purpose Thread, color 0620 Slate
- 3/4 yd (68.58cm) sport-weight fabric, 60” (152.40cm)
- 5/8 yd (57.15cm) cotton lining
- 5/8 yd (57.15cm) single-sided fusible foam, 58” (147.32cm)
- (64) assorted buttons, up to 1 1/4" (3.18cm) diameter*
- Large-eye hand-sewing needle
- Removable fabric marker
- *Other thread options include Coats & Clark™ Button & Craft thread and Coats & Clark Dual Duty XP Heavy thread
- **It’s less expensive to buy bagged buttons than to purchase them individually. Check the craft section of your favorite store for ready-made groupings by color.
Instructions
Cutting
-
From foam, cut:
(2) rectangles, 18” x 19” (45.72cm x 48.26cm) -
From the lining, cut:
(2) rectangles, 18” wide x 17” tall (45.72cm x 43.18cm)
Preparation
-
Following the manufacturer’s instructions, fuse the foam rectangles to the wrong side of the sport-weight fabric. Cut along the edges of the foam. Cut out a 2” (5.08cm) square from each lower corner of the rectangles.
-
Cut a 2” (5.08cm) square from the lower corners of the lining rectangles, noting that the 17” (43.18cm) is the height of the lining.
-
From the remaining sport-weight fabric, cut (2) strips, 6 1/2” x 22” (16.51cm x 55.88cm) for handles.
Seam allowances are 1/2” (1.27cm).
Assembling the Tote Front
-
Mark the upper and lower center points on one tote rectangle.
-
Using the removable marker, draw a 12” (30.48cm) square centered across the tote front width and 3 1/2” (8.89cm) from the upper edge. Draw 1 1/2” (3.81cm) segments vertically and horizontally within the square to create a grid.
-
Using a double strand of Coats & Clark™ Jeans Thread, sew big stitches along the outline and all grid lines.
-
Center and sew a button in each square, varying color placement and the sewing patterning used for attachment. Knot each one securely.
Assembling the Handles
-
Press each handle strip in half lengthwise to form a center crease. Fold both raw edges to meet the center crease and press. Repeat for the second handle.
-
Edgestitch each long edge of both handles.
Assembling the Tote
-
With right sides together, pin the tote front and back pieces together, matching raw edges. Sew the side and bottom seams. Press the seams open.
-
To box the corners, fold the tote side seam exactly on top of the bottom seam and sew across the straight edge. Repeat for the second corner. Turn the tote right side out.
-
Press under a 1 1/2” (3.81cm) hem at the tote upper edge.
-
Open out the hem and position a handle on the tote front and another on the back, 3” (7.62cm) from center and raw edges matching the hem edge. Stitch the handle to the hem using a 1” (2.54cm) tall box.
-
Fold the hem back into place and loosely hand stitch the raw edge around the top to the foam backing only.
Assembling the Lining
-
With right sides together, pin the two lining rectangles together, matching raw edges. Sew the side and bottom seams. Press the seams open.
-
Box the corner as for the tote.
-
Leave the lining wrong side out.
Finishing
-
With wrong sides together, slip the lining into the tote. Push it into the lower corners and pin.
-
Matching the side seams, turn under the upper lining edge so that the fold is about 1” (.54cm) from the upper tote edge. Pin in place all around.
-
Hand-stitch the lining folded edge in place around the upper tote hem.
Button Options
There’s more than one way to sew on a four-hole button. This tote gives you lots of opportunities to try them all! Stitches do not have to be horizontal- change the pattern to add variety to the design.
Read NextSimple Life Tote Bag Tutorial