Nana's Upcycled Wool Bags
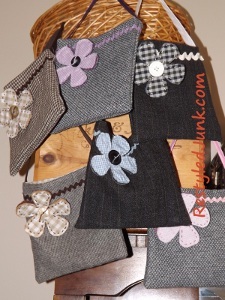
Dip into your grandma's stash of fabric and start brainstorming those fabric craft ideas. Nana's Upcycled Wool Bags are perfect for sewers who want to carry their belongings in style. The floral accent helps the bag make a big statement. If you don't have fabric on hand, head to the thrift store and pick up some inexpensive wearables. This purse can be worn by a little girl or an older woman, making it extremely versatile.
Material:
- Cardstock
- Ruler
- Pencil
- Scissors
- Old wool clothing
- Tailor's chalk
- Straight pins
- Cotton print fabric
- Sewing machine
- 1/2- to 1-inch wide double-fold bias tape
- Iron
- 4-inch flower cookie cutter or die-cut shape
- Felt (small amount)
- Rick-rack
- Embroidery floss and needle
- Large flat button
Instructions:
- Trace an 8-1/2 inch square on card stock and cut out. This is the basic pattern for the bag.
- Cut open wool suit pants or jackets at the seams. Layer two wool pieces together. If the back of the wool fabric looks different than the front, layer with the fronts facing each other. Place the bag pattern on the layers and trace around it using tailor's chalk. Pin the layers together and cut out the shape.
- Choose a cotton print fabric for the lining. Trace the pattern and cut out in the same way as the wool.
- Sew around three pinned edges of both the wool squares and the lining squares using a 1/4-inch seam allowance. The open edge is the top of the bag. When sewing the edges, leave a 3-inch opening in the center of the lining's bottom.
- Cut a 16-inch length from 1/2- to 1-inch wide double-fold bias tape that coordinates with the bag's lining. Using a matching thread and a zigzag stitch, close the long open edge of the bias tape. This is the handle.
- Clip the bottom corners of the wool bag to eliminate bulk. Match and pin the ends of the handle over the side seams of the bag at the top opening.
- Insert the right-side-out wool bag into the wrong-side-out fabric lining. Match the raw edges of the opening and the side seams. Pin around the top of the wool bag. Sew the pinned edge using a 1/4-inch seam allowance. Turn the bag right side out through the opening in the lining and press.
- Cut a 17-inch length from coordinating rick-rack trim. Wrap the rick-rack around the bag and pin 1-inch below the top edge. Overlap the ends. Using all strands of coordinating embroidery floss, stitch a running stitch through the center length of the rick-rack to attach. Stitch through to the inside of the bag.
- Using a 4-inch flower cookie cutter or die-cut shape as a pattern, cut one wool, one felt and one fabric flower. The wool is a scrap from the bag and the fabric is a scrap from the lining.
- Stack the flowers with the felt in the center and the fabric on top. Using all strands of coordinating embroidery floss, sew a running stitch around the flower petals through all layers, 1/4 inch from the edge.
- Lay the stitched flower on one side of the bag. This will be the front of the bag. Arrange the flower where desired. I thought it looked cute and whimsical in the upper left hand corner. Place a large flat button in the center of the flower. Using all strands of the embroidery floss, stitch the button and flower to the front of the bag. Tie the ends in a knot on the front. Cut the floss leaving 1/2-inch tails.
Read NextUpcycled Denim Tote Bag
Your Recently Viewed Projects
furrykidzpaperworx 9128646
Apr 14, 2014
I have made bags similar to this so know how easy they are to make. They're really nice to carry for a quick walk or jet to store. I put a pocket inside mine to carry my keys so I could find them quicker. This is a great project, using up small pieces of fabric and trim. The flowers make them even better, love the look. The blogger that made these is a great gal and crafter.
Report Inappropriate Comment
Are you sure you would like to report this comment? It will be flagged for our moderators to take action.
Thank you for taking the time to improve the content on our site.

