Dyed Felt Spring Wreath
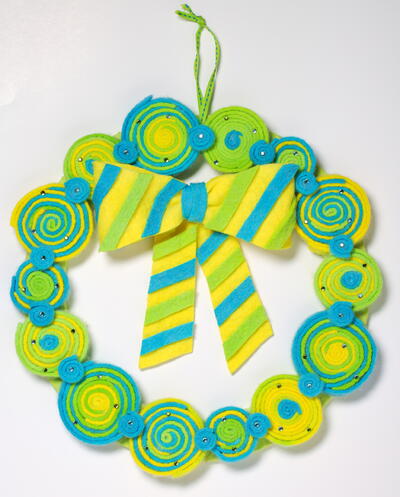
This funky, brightly colored wreath is a great way to welcome people into your home this spring. It's easy to make using fashion dyes and iron-on crystals and kids love it. You can even change up the colors or patterns and personalize it for a year-round decoration in a kid's room.

Materials:
- Tulip One-Step Fashion Dyes™
- Turquoise
- Yellow
- Green
- Tulip Glam-It-Up! ™ 300 Iron-On Crystals™
- Multi-Pack
- Aleene’s Crafting Adhesives
- Fabric Fusion™
- Wool felt – white or ivory – 2 yards (must be natural fiber)
- Plastic trash bag
- Scissors
- Cardboard
- Ribbon – ½ yard – color to match
- Rotary cutter, ruler and mat - optional
- Crayon
- Sewing pins
- Low tack masking tape
- Steam iron
- Toothpicks
- Foil
- Ruler
- Pencil
Instructions:
- Cover work surface with trash bags.
- Wet felt under water then place in washer and place on “spin” cycle. Place damp felt on surface and cut into three equal pieces. Smooth out each felt piece on work surface.
- Wearing gloves from box, fill each bottle of dye with water to line indicated then shake until thoroughly mixed.
- Squeeze ¾ of Yellow dye bottle onto one felt piece, squeezing and working dye into felt with hands. Repeat step on another piece with Turquoise dye. To create Lime color, pour Green dye into Yellow bottle and shake until mixed. Squeeze this mixture on last felt piece. Let set 4-6 hours then wash separately in washer with a large load of cold water and on a short, delicate cycle. Remove and line dry.
- To create wreath backing, measure and cut a 12” circle from cardboard. Draw a border around circle 2” thick, then cut out center forming a wreath shape.
- Iron each felt piece, on one side, if needed. Place wreath backing on Lime felt then use pencil to lightly trace shape onto felt. Cut out shape, adding a ¼” border. Squeeze Fabric Fusion™ on one side of wreath backing and smooth with finger. Place felt piece in place and press to secure. Let dry.
- Measure and cut one 2” x 16” and two ½” x 7” strips from yellow felt. These will form bow.
- Use rotary cutter or ruler and scissors to cut several ½” strips from each piece of felt. Select a strip of felt in desired color and add a drop of Fabric Fusion™ to end. Start tightly rolling strip; a second color can be glued in place on first strip as you roll it, trimming ends if needed and adding drops of glue along the way as it is rolled. Stick a pin in the end to hold in place until dry. Continue rolling various sizes and color variations and enough to fit on wreath backing. Refer to photo.
- Cut ¼” wide strips of Turquoise felt and swirl into smaller rounds creating 14 total.
- To create hanger, tie ribbon around wreath, determine length and knot ends together.
- Place all swirls where desired on wreath backing then use Fabric Fusion™ to glue in place. Glue smaller rounds where shown.
- Cut thin strips of Turquoise and Lime felt. Glue at diagonal on one side of bow pieces. Let dry then trim excess for a straight edge. To create bow, glue ends of wider yellow strip together forming loop. Cut a small piece of Turquoise felt and wrap around center, gathering center as shown. Trim ends with ½” overlap then glue in place. Hold with tape until dry. Glue remaining pieces on back of bow to create tails.
- Squeeze a small puddle of Fabric Fusion™ onto foil. Use toothpick to add a small dot of glue where crystal is desired. Touch tip of crayon to top of Turquoise or Lime crystal from carousel then place in glue. The crayon will hold crystal just long enough to put in place. Glue on all remaining crystals. Let dry.
- Position bow where shown then add glue to back of bow where it touches wreath. Let dry.
Find this project and many more Easter crafts in the 95-page Easter Craft and Recipe eBook.
Read Next21 DIY Rainbow Crafts
Your Recently Viewed Projects
Report Inappropriate Comment
Are you sure you would like to report this comment? It will be flagged for our moderators to take action.
Thank you for taking the time to improve the content on our site.

