Anchor Tie Dye Tee Shirt
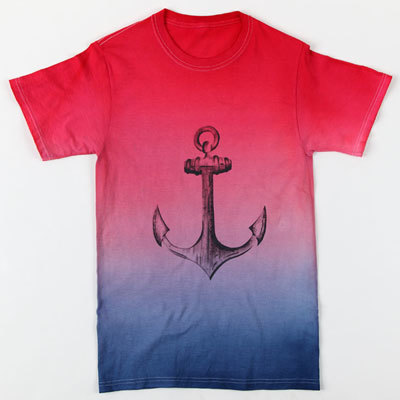
Learn how to do a new tie dye technique with the Anchor Tie Dye Tee Shirt tutorial. This ombre tie dye design goes from red down to blue, almost like a sunrise over the ocean. You will use both the ombre dyeing method and painting skills in this nautical themed craft. If your family loves boating, making these t-shirts for the whole crew would be adorable. You could even customize these tees by changing the colors of dye and paint you apply. Set sail with these seaworthy t-shirts.
Primary TechniqueGeneral Crafts

SeasonSummer
Materials:
- Tulip® One-Step Tie-Dye Kit® Rainbow
- Tulip® Soft Fabric Paint™: Ebony 1 oz
- Disposable plastic table cover
- Craft knife
- Freezer paper
- Iron
- Large water cup
- Pencil
- Shirt board
- Wide disposable paintbrush
- Paintbrushes
- White 100% cotton T-shirt
Instructions:
- Prewash fabric without fabric softener. Do not dry.
- Cover work surface with plastic table cover. Lay damp fabric on prepared surface.
- Prepare Red and Blue dyes according to package instructions.
- Apply Red dye to neckline and shoulders of shirt. Use dampened wide paintbrush to blend color downward. Add more dye or water to blend color evenly, dark to light. Thoroughly rinse paintbrush.
- Apply Blue dye at hemline of shirt, and use rinsed paintbrush to blend color upward, adding more dye or water to evenly blend colors.
- Cover fabric with plastic table cover. Let set 6-8 hours.
- Rinse fabric in warm water until water runs clear.
- Fill washer to large load setting with hottest water suitable for fabric and a small amount of non-bleach laundry detergent. Wash and dry separately for the first few washes.
- Trace anchor onto a large piece of freezer paper.
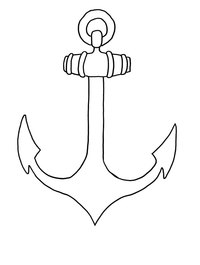
- Cut out design with craft knife to create stencil. Iron stencil onto front of shirt.
- Insert shirt board between layers of tee.
- Use Ebony Soft paint and paintbrush to paint in and accent anchor. Allow to dry. Remove stencil.
Read NextTie Dye Dollar Store Flowers

