Country Classic Dragonfly Wall Art

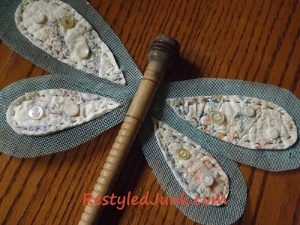
DIY wall decor can add an unexpected touch to even the most drab space. Spice up your walls with your own handmade Country Classic Wall Art. For this project you can cut up an old scrap quilt and repurpose wooden textile spindles. If you don't have these items on hand, head to your local thrift store or rummage sale. This project is perfect for anyone who doesn't want to spend a lot on quality home decor items. This project is unexpectedly gorgeous - you'll want to leave it hanging on your wall for years to come.
Primary TechniqueGeneral Crafts

Materials:
- Cardstock
- Ruler
- Household scissors
- Pencil
- Tape
- Old window screen
- Acrylic paint
- Paintbrush
- Old cutter quilt
- Fabric scissors
- Straight pins
- Embroidery floss and needle
- Craft wire and wire cutters
- Straight textile spindle
- Flat white buttons
- Craft glue
Instructions:
- Cut one 6-inch-square and one 7" wide by 8" long rectangle from cardstock.
- Fold the square in half creating a two layers. Fold the rectangle in half, matching the 8" edges. You now have a 3" by 6" long rectangle and a 3-1/2" wide by 8" rectangle.
- Sketch a teardrop on each rectangle, completely filling the space. Cut out the teardrop shapes through both layers of the folded card stock.
- Lay the larger teardrops on your work surface with the points touching. Shift the drops with the points overlapping 1-1/2". Tape the points to secure. This is the pattern for the top screen wings.
- Lay the smaller teardrops on your work surface with the points touching. Shift the drops with the points overlapping 1-1/4". Tilt the larger ends of the teardrops down until the top edge is a straight horizontal line. Tape the points to secure. This is the pattern for the dragonfly's bottom screen wings.
- Cut one 4" wide by 5-1/4" long rectangle and one 3" wide by 4" long rectangle from card stock. Sketch a teardrop on each rectangle with the lengths of the teardrops running down the long expanse of the rectangles. Cut out the rectangles. These are the patterns for the quilt insets on the wings.
Constructing the Dragonfly:
- Place the screen wing patterns on old window screen and trace around each pattern once using a marker.
- Using household scissors, cut out each traced wing just inside the traced lines. Note: Teeny bits of screen wire tend to fly when cutting and trimming. Cutting the screen outdoors while wearing safety glasses is recommended.
- Apply a light coat of acrylic paint to both sides of the screen wings. I used light green paint to coordinate with the quilt I was using. Allow the paint to dry.
- Trace two each of both quilt inset patterns on the back of an old cutter quilt. Cut out the insets.
- Center and pin the larger insets on the top wings and the small insets on the bottom wings. Stitch the insets to the screen using a matching embroidery floss and a running stitch 1/4" from the edge of the insets.
- Place the bottom edge of the top wings over the top edge of the bottom wings by 1/2". Using a small bit of craft wire, sew the overlap together at the center of the wings. This will be hidden behind the spindle body of the dragonfly.
- Cut an 8" length of craft wire. Thread the wire through the middle-back of the wings. Form the ends into a ring and twist the ends to secure. This is the hanger.
- Place a straight textile spindle over the center-front of the wings for the body. The wider end of the spindle is the head of the dragonfly. Wire the spindle to the wings using craft wire.
- Space and glue an assortment of flat white buttons to the quilt insets on the wings. Allow the glue to dry.
Up Next:
Read NextMosaic Wall


