Groovy Socks
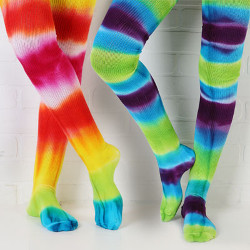
If you are wondering how to make Groovy Socks, look no further. This DIY tie dye tutorial by Lauri Eaton for I Love to Create tells you how to make your socks stand out from all the rest in a simple and fun afternoon project. Crafting brings people together, so use your tie die techniques to gather a group of friends for some good ol' do i t yourself clothing. It's also a great team bonding idea for those of us with athletes in the family.

Materials:
- Tulip® SuperBIG™ One-Step Tie-Dye Kit™
- Tulip® Dye Zip Ties™
- Tulip® Surface Cover™
Miscellaneous
- Pastry cooling rack (optional)
- Washer/dryer
- White tall socks – 100% cotton
- Plastic tablecloth
Instructions:
- Wash socks and leave damp. Cover work surface with plastic tablecloth and lay damp socks on prepared surface.
- Fold each sock in half, top to toe. Secure at regular intervals with zip ties.
- Mix desired dye colors according to package instructions.
- Lay tied socks on pastry rack if desired. Tip: Placing socks on a pastry rack while dyeing prevents socks from sitting in a pool of dye and avoids the risk of dye spreading to unwanted sections. Apply desired dye colors to tied sections.
- Allow socks to set for time recommended in package instructions, or overnight.
- Rinse socks under warm running water to remove excess dye.
- Remove zip ties and wash and dry socks as indicated in instructions.
Read NextEasy Sashiko Visible Mending

