Polka Dot Apron
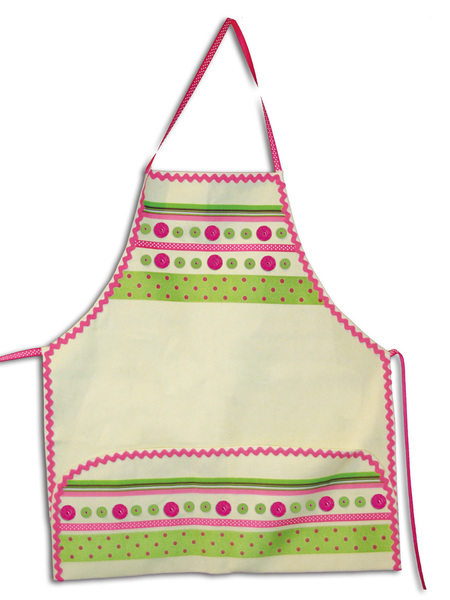
Cover up your cute clothes with this cute Polka Dot Apron! This free tutorial shows you how to make an apron covered in polka dots.
Materials:
- Ka-Jinker Tool
- Package fuchsia large circle Ka-Jinker Jems
- Package lime green small circle Ka-Jinker Jems
- Package pink Ka-Jinker Links
- Canvas Creations natural canvas adult apron
- Package hot pink medium rick-rack
- 3 yards 3/8" pink/white dot grosgrain ribbon
- Yard 1 1/2" pink/white dot grosgrain ribbon
- Yard 7/8" pink/green stripe grosgrain ribbon
- Fabric Glue
Instructions:
- Cut neck and tie strings from apron. Replace with lengths of 3/8" ribbon by gluing ends to the back of the apron.
- Using photo for placement cut and glue rows of ribbon to the top of the apron, leaving about 1 1/4" space between rows.
- To indicate placement of bottom pocket fold up lower edge of apron 7" and press.
- Unfold pocket. Starting at the crease line on one side of the front of the apron, glue rick-rack to edge of apron. Bring rick-rack up one side, across the top and then down the other side, stopping rick-rack at the opposite crease line.
- Fold up lower edge of apron. Using photo for placement cut and glue lengths of ribbon to pocket, leaving about 1 1/4" space between stripe and narrow dot ribbons.
- Glue rick-rack around sides and top of pocket.
- Following manufacturers' instructions, Ka-Jink a row of Ka-Jinker Jems to the pocket flap between the ribbons. Center and evenly space Ka-Jinker Jems across pocket. Alternate one layer of fuchsia Ka-Jinker Jems with 2 small lime green Ka-Jinker Jems.
- Glue sides of pocket to sides of apron. Add a line of glue down the back of the center of the pocket creating 2 pocket sections.
- Following a similar pattern, Ka-Jink two rows of alternating fuchsia and lime green Ka-Jinker Jems to the top of the apron.
Read NextRoyal Headpiece

