Summer Vibes Tote & Sandals
Make your summer a little brighter with this hand painted shoes and tote bag idea!
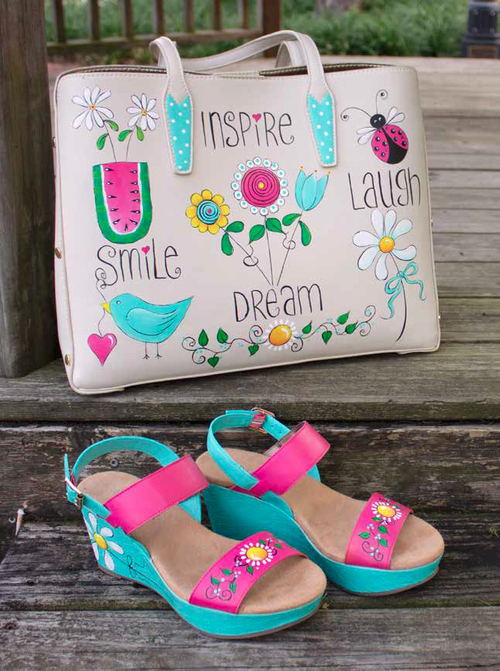
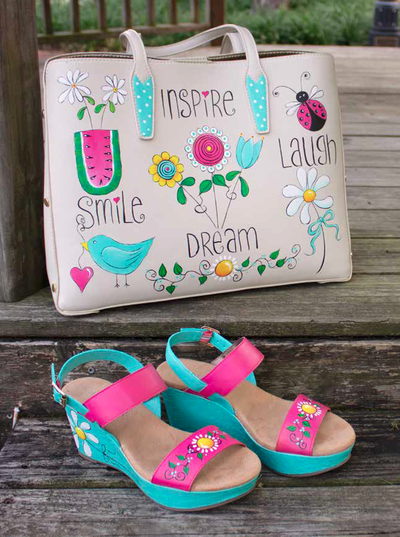
Hand painting your shoes and accessories is a fun activity for people who'd like to creatively express themselves. Your wardrobe pieces can have any pattern that you'd like, but we especially like the design for these Summer Vibes Tote & Sandals! With its vibrant colors and its cute drawings, this hand painted shoes and tote bag DIY is perfect for the summer. You'll look so fresh and fashionable that everyone will surely be jealous! Now, you can have a tote bag and a pair of shoes that'll shine under the summer sun.
Time to CompleteIn an evening
MaterialsPaint
Primary TechniquePainting

Project TypeMake a Project
Materials List
- DecoArt® Stylin™ in Green, Purple, Aqua, White, Yellow, and Fuchsia
- Baby wipes
- Stylus
- Ruler
- Graphite paper
- White or black water soluble pen
- #2 Round Brush, 10/0 Liner Brush, #8 Flat Brush, #1 Liner Brush
Instructions:
Sandals:
-
Paint the wedge of the sandals with Aqua. This will take two coats; let the first coat dry before adding the second coat. Repeat for the ankle straps. Paint the remainder with Fuchsia. When dry, transfer the design with graphite paper. (The design will transfer easily on a painted surface.)
NOTE: The left and right designs for the shoes. -
Flower: Paint the petals with White. With the same brush, pick up a tiny bit of Aqua on the corner and shade along the base of the petals. Paint the center with an undercoat of White. Then paint with Yellow. With the same brush, pick up a tiny bit of Fuchsia on the corner and shade along the bottom. Line the highlight with White. Paint the bow with the #2 round brush loaded with Aqua, tipped in White. Line the bow with Black. Line the stem with Black.
-
Vine and Leaves: Use the #2 round brush loaded with Green and tipped into Yellow to paint in the leaves. Line the vines with Black. Dot with tiny clusters of Aqua.
Tote
-
Cut out all the pattern pieces and place on the tote for placement idea. Transfer the pattern onto the purse with graphite paper.
NOTE: This may not always work depending on the purse surface. In this case, I cut out the shapes and traced around them with removable pen. -
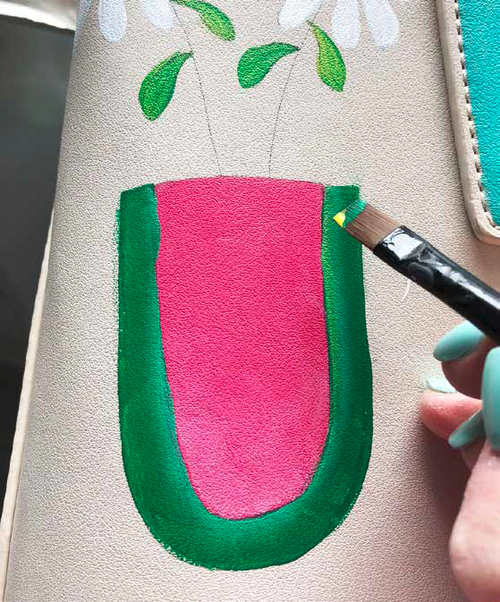
Watermelon: Paint the watermelon with Fuchsia. With the same brush, pick up a tiny bit of White on the corner and gently blend into the Fuchsia to highlight the bottom half of the melon. Paint the rind with Green. With the same brush, pick up a tiny bit of Yellow on the corner and highlight the edge where the rind meets the melon. Paint the stripes on the rind with a brush mix of Green and Yellow.
-
Use a stylus or a #2 round brush to paint the seed with Black. When dry, use a 10/0 liner brush to line in a highlight with White.
-
Use the #2 round brush to line White where the rind meets the melon.
-
Daisies: Use the #2 round brush to paint in the daisies. Dot the centers with Yellow, then again with Fuchsia.
-
Leaves: Use the #2 round brush loaded with Green and tipped into Yellow to paint in the leaves. Line the stems with Black.
-
Blue Bird: Paint the bird with Aqua. With the same brush, pick up a tiny bit of White on the corner and highlight the wing. Paint the beak with Yellow.
-
Heart: Paint the heart with Fuchsia. Line the highlight with White. Line the feet and string with Black. Dot the eye with Black, then again with White.
-
Flower Bouquet - Left Flower: Paint the petals with a coat of White to undercoat the Yellow. Paint the petals with Yellow. With the same brush, pick up a tiny bit of Fuchsia on the corner and shade the base of the petals around the center. Paint the flower center with Aqua. With the same brush, pick up a tiny bit of White on the corner and highlight. Line the swirl with Black. Dot the center with Fuchsia.
-
Flower Bouquet - Middle Flower: Paint the center with Fuchsia. With the same brush, pick up a tiny bit of White on the corner and highlight. Line the swirl with Black. Dot the center with Yellow. Dot the petals with White and then again with smaller dots of Aqua.
-
Flower Bouquet - Right Flower: Paint the tulip with Aqua. With the same brush, pick up a tiny bit of White on the corner and highlight the center section of the tulip. Dot the tips with Yellow, then again with Fuchsia.
-
Leaves: Use the #2 round brush loaded with Green and tipped into Yellow to paint in the leaves. Line the stems with Black.
-
Ladybug: Paint the wings with Fuchsia. Dot with Black. Base the body with Black. Dot the eyes with White, then with Black. Line and dot the antenna with Black.
-
Large Daisy: Paint the petals with White. With the same brush, pick up a tiny bit of Aqua on the corner and shade along the base of the petals. Paint the center with an undercoat of White. Then paint with Yellow.
-
With the same brush, pick up a tiny bit of Fuchsia on the corner and shade along the bottom. Line the highlight with White. Paint the bow with the #2 round brush loaded with Aqua, tipped in White. For the shoes, line the bow
with Black. Line the stem with Black. -
Lettering: Line all the lettering used the #1 liner brush and Black. Use a stylus or a #2 round brush to paint the hearts with Fuchsia.
-
Finishing: Outline as desired with Black using the 10/0 liner. When everything is dry, you can then remove any pen lines by wiping gently with a baby wipe.
Patterns
-
Watermelon and Blue Bird:
-
Flower Bouquet:
-
Ladybug and Daisy:
Tips
-
Basic painting is done with a #8 flat brush.
-
Undercoat the Yellow paint first with a coat of White.
-
Liner work is done with a 10/0 liner. All outlining is done at the very end.
What's your favorite summer craft?
Read NextEasy Sashiko Visible Mending


