Have a Heart Keepsake
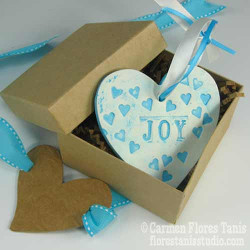
If you're in the midst of bridal shower planning then chances are you need some DIY craft ideas and instructions, STAT. This Have a Heart Keepsake from Carmen Flores Tanis is a great idea for DIY shower gifts. It celebrates the sentiment of the occasion perfectly, and it looks beautiful. Each guest will leave the bridal shower anticipating the big day. This is a great way to instill romance into all of your guests' hearts for a price that's right. Have a heart. Don't deny the bridal shower this keepsake.

Materials:
- Air dry clay
- Acrylic paint (sky blue)
- Chipboard gift box (3"x3"x2")
- Chipboard (for heart shape on top of box)
- Ribbons (for keepsake and for box)
- Shredded paper for stuffing box
- Rolling pin
- Letter & tiny heart stamps (look in the cake or clay sections of your craft shop)
- Heart shaped cookie cutters
- Die cut machine and heart die
- Die cut machine texture plate
- Setter with punching tips
- Slot Punch
- Paint brush & plastic plate for a palette
- Cookie sheet w/ piece of parchment paper
- Clay hole cutting tool or plastic straw
- Paper towels or cloth
- Scissors
Instructions:
-
Using the rolling pin, roll out a chunk of air dry clay to make a slab about 1/4" thick. Use a cookie cutter to cut out a heart shape. Place it on the parchment paper on the cookie sheet. Might as well make a bunch while you're at it!

-
Decorate the clay shapes with the letter and heart stamps. You could also stamp individual names or holiday phrases instead. A favorite quote would be lovely! Use the hole cutting tool or straw to add a hole for hanging. Set aside and let dry overnight.

-
Put a dollop of acrylic paint on the plastic plate and then paint the front and sides of one of the now dry ornaments. Working quickly before the paint dries, use a paper towel or cloth (wet with just a few drops of water) to wipe the excess paint from the surface of the ornament, leaving paint in the crevices. Set aside to dry. Once dry, paint the back of the ornament. Let dry.


-
Tie a length of ribbon through the hole and you're done! On to the box.
-
Put a large punching tip on the Making Memories Instant Setter and use the tool to punch two holes on the bottom of the box. Thread a ribbon through the holes.

-
Make a heart cut out by running the chipboard through the die cut machine using the heart die. Then texture the cut out chipboard heart by running it through the die cut machine again this time using the texture plate.
-
Punch two slots on the sides of the heart cut out with the EK Tools Heavy Duty Vertical Slot Punch. Slide the heart cut out onto the ribbon and position it on the top of the box. (You can even add two stacked hearts if you like.) Add a little shredded paper as stuffing in the box and nestle your keepside inside. Tie the ribbon ends into a bow on the side of the box to finish.

- That's it! You can personalize these favor boxes by using different colored ribbons, cut out shapes and different sized boxes. The possiblities are endless!
Read NextWinter Pinecone DIY Wedding Favors
Your Recently Viewed Projects
Report Inappropriate Comment
Are you sure you would like to report this comment? It will be flagged for our moderators to take action.
Thank you for taking the time to improve the content on our site.

