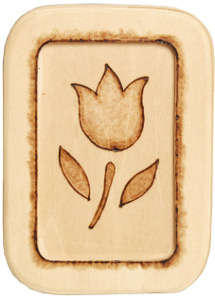
Easy Woodburned Tulip Plaque
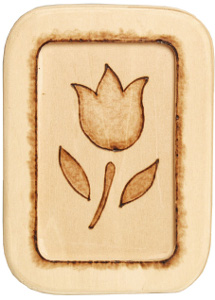
Even older kids (with supervision) can do this easy wood-burning project with a beginner woodburning tool and pattern for kids. Kids can give this woodburned tulip plaque as a gift or keep for their rooms.
Materials:
- Walnut Hollow® #24911 Creative Woodburner® Beginner
- Walnut Hollow® 24369 Rectangle Recessed Plaque
- Walnut Hollow® 26324 Woodburning Patterns-Everyday for Kids (Available on-line)
- Walnut Hollow® #1095 Graphite Transfer Paper
- Other Supplies: eraser, paper towel, pen or pencil, pliers, sandpaper, spray varnish, tape
Instructions:
- To prepare wood for woodburning, use sandpaper to lightly sand wood surface. Remove dust with paper towel.
- Before using hot tool, read through all instructions and follow all safety precautions listed on packaging. Attach Flow Point to tool and tighten with pliers. Secure stand to hard surface with tape. Place tool on stand. Plug into electric outlet and let heat for 4-5 minutes. Practice on a scrap of wood to get a feel for the tool before beginning project.
- Place pattern on plaque. Tape in place. Slide graphite paper under pattern (carbon side down). Use pen or pencil to trace pattern. Remove graphite paper and pattern.
- Use Flow Point to burn all traced lines. Use point to lightly shade inside the woodburned lines. Use point to shade edge as shown in photo. Experiment with other points if they are available. When complete, unplug tool and let cool.
- Use eraser to remove any visible graphite lines. Other options: Use colored pencils, magic markers or paint to add color to woodburned tulip. If using paint, let dry before proceeding.
- When complete, apply 2-3 coats of spray varnish for a protective finish.
Read NextPurple Sunrise Decorative Cross

