Holiday Stars Quilt
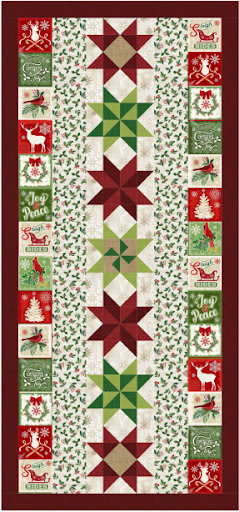
Get in the holiday spirit with this Holiday Stars Quilt. With fabulous shades of red and green, you will love staring at this cheery design all season long.
Materials List
-
Fabric Requirements
1/2 yard each:
Holiday-C8654 Multi
Holiday-C8659 Natural
Holiday-C8660 Natural
-
1/3 yard Mix-C7200 Cranberry
-
1 yard Mix-C7200 Wine (includes 3/8 yard for binding)
-
1/4 yard each:
Mix-C7200 Tan
Mix-C7200 Clover
Mix-C7200 Pine
-
2 yards backing fabric of your choice
- 36" × 69" batting
DIRECTIONS
CUTTING
-
From Holiday-C8654 Multi:
• Fussy-cut three 4" × width-of-fabric (WOF) strips along the block lines. Sew the strips together end to end. Sub-cut two 4" × 56 1/2" strips, making sure to have allow 1/4" on each end of the block strip for the seam allowance.
From Holiday-C8659 Natural:
• Cut three 4 1/2" × WOF strips. Sew the strips together end to end. Sub-cut two 4 1/2" × 56 1/2" strips.
From Holiday-C8660 Natural:
• Cut two 2 1/2" × WOF strips. Sub-cut twenty-eight 2 1/2" squares.
• Cut two 4 1/2" × WOF strips. Sub-cut twenty-eight 4 1/2" × 2 1/2" rectangles.
From Mix-C7200 Cranberry:
• Cut two 2 1/2" × WOF strips. Sub-cut twenty-four 2 1/2" squares.
• Cut one 2 7/8" × WOF strip. Sub-cut four 2 7/8" squares.
From Mix-C7200 Wine:
• Cut five 2 1/2" × WOF strips. Sew the strips together end to end. Sub-cut two 2 1/2" × 27 1/2" strips and two 2 1/2" × 56 1/2" strips.
• Cut one 2 1/2" × WOF strip. Sub-cut sixteen 2 1/2" squares.
• Cut one 2 7/8" × WOF strip. Sub-cut four 2 7/8" squares.
• Cut five 2 1/2" × WOF strips for binding.
From Mix-C7200 Tan:
• Cut one 4 1/2" × WOF strip. Sub-cut two 4 1/2" squares, two 2 3/8" squares and two 2 7/8" squares. Cut the 2 7/8" squares in half once diagonally.
From Mix-C7200 Clover:
• Cut one 2 1/2" × WOF strip. Sub-cut sixteen 2 1/2" squares.
• Cut one 2 7/8" × WOF strip. Sub-cut four 2 7/8" squares.
From Mix-C7200 Pine:
• Cut one 2 7/8" × WOF strip. Sub-cut four 2 7/8" squares, two 2 3/8" squares and eight 2 1/2" squares.
BLOCK CONSTRUCTION
All seam allowances are 1/4" and pieces are sewn right sides together.
-
Variable Star Block
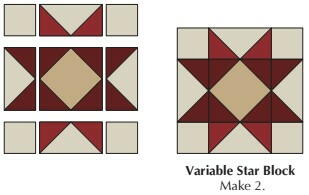
Draw a line diagonally from corner to corner on back of a 2 1/2" C7200 Cranberry square. Noting the line direction, align the marked square with left side of 2 1/2" × 4 1/2" C8660 Natural rectangle. Sew on the drawn line. Trim the excess fabric 1/4" from the sewn line. Press the seam toward the dark fabric. Repeat on the right side of rectangle to make a flying-geese unit. Press and trim to 2 1/2" × 4 1/2". Make a total of eight flying-geese units. -
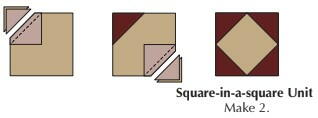
Draw a diagonal line from corner to corner on back of a 2 1/2" C7200 Wine square. Align the marked square with the upper left corner of a 4 1/2" C7200 Tan square. Sew on the drawn line. Trim the excess fabric 1/4" from the sewn line. Press the seam toward the dark fabric. Repeat on the remaining three corners of the square to make a square-in-a-square unit. Press and trim to 4 1/2" square. Make two square-in-a-square units.
-
Sew a 2 1/2" C8660 Natural square to each end of a flying-geese unit to make an outer row. Make a total of four outer rows. Noting the orientation, sew a flying-geese unit to each side of a square-in-a-square unit to make a middle row. Noting the orientation, sew an outer row to the top and another to the bottom of the middle row to complete the block. Press the block and trim to 8 1/2" square. Make two Variable Star Blocks.
-
Sarah’s Choice Block
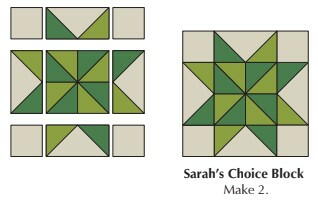
Following step 1, make a total of eight flying-geese units using a 2 1/2" C7200 Clover square on the left and a 2 1/2" C7200 Pine square on the right side of the 2 1/2" × 4 1/2" C8660 Natural rectangle. -
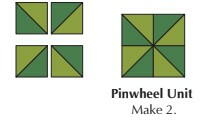
Draw a diagonal line from corner to corner on back of 2 7/8" C7200 Clover square. Place it right sides together with a 2 7/8" C7200 Pine square. Sew 1/4" on each of the drawn line. Cut on the drawn line. Press the seam toward the dark fabric and trim to 2 1/2" square. Make a total of eight half-square triangles (HST).
-
Following Figure 6, sew together the four HST units to make a pinwheel. Make two pinwheel units.
-
Sew a 2 1/2" C8660 Natural square to each side of the Clover/Pine flying-geese unit to make an outer row. Make a total of four outer rows. Noting the orientation, sew a flying-geese unit to each side of the pinwheel unit to make a middle row. Noting the orientation, sew an outer row to the top and another to the bottom of the middle row to complete the block. Press the block and trim to 8 1/2" square. Make two Sarah’s Choice Blocks.
-
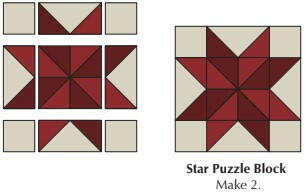
Star Puzzle Block
Following Figure 8 for fabric placement and using the directions for the Sarah’s Choice Block, make two Star Puzzle Blocks, using C7200 Cranberry, C8660 Natural and C7200 Wine fabrics. -
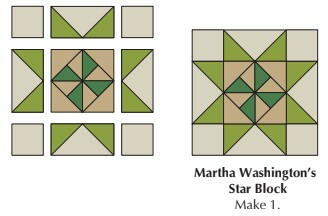
Martha Washington’s Star Block
Following step 1, make four flying-geese units using C7200 Clover and C8660 Natural fabrics.
-
Following step 5, make four HST using 2 3/8" C7200 Tan and C7200 Clover squares. Trim to 2" square.
-
Following Figure 9 for fabric placement, sew two HST together to make a half pinwheel. Sew the long sides of the half pinwheels together to make center pinwheel unit. Press and trim to 3 3/8" square.
-
Sew the diagonal edge of the C7200 Tan triangle to opposite sides of the pinwheel unit. Press the seam toward the corner. Repeat for the remaining two sides of the pinwheel. Press the seams and trim the unit to 4 1/2" square.
-
Sew a 2 1/2" C8660 Natural square to each end of a flying-geese unit to make an outer row. Make two outer rows. Noting the orientation, sew a flying- geese unit to each side of the pinwheel-in-a-square unit to make the middle row. Noting the orientation, sew an outer row to the top and the other to the bottom of the middle row to complete the block. Press the block and trim to 8 1/2" square.
-
Quilt Top Assembly
Sew the pieced blocks together in order from top to bottom: Variable Star Block, Sarah’s Choice Block, Star Puzzle Block, Martha Washington’s Star Block, Star Puzzle Block, Sarah’s Choice Block and Variable Star Block. Press the seams in one direction. Trim the strip to 8 1/2" × 56 1/2". -
Sew a 4 1/2" × 56 1/2" C8659 Natural strip to each side of the pieced block center.
-
Noting the orientation, sew a 4" × 56 1/2" C8654 Multi strip to each side of the quilt center.
-
Sew a 2 1/2" × 56 1/2" C7200 Wine strip to each side +of the quilt center. Sew a 2 1/2" × 27 1/2" C7200 Wine strip to the top and the other to the bottom of quilt center.
-
Finishing
Layer the quilt top, batting, and backing, and quilt as desired. -
Stitch the binding strips together end to end using diagonal seams. Fold and press the resulting long strip in half lengthwise with wrong sides together. Stitch to the quilt front, matching raw edges and mitering the corners.
-
Fold the binding to the quilt underside and hand-stitch the folded edge to the quilt back.
'Tis the Season to Celebrate! Discover More Christmas Crafts
If you enjoyed creating the Holiday Stars Quilt and want to keep the festive crafting spirit alive, why not try your hand at these Christmas crafts?
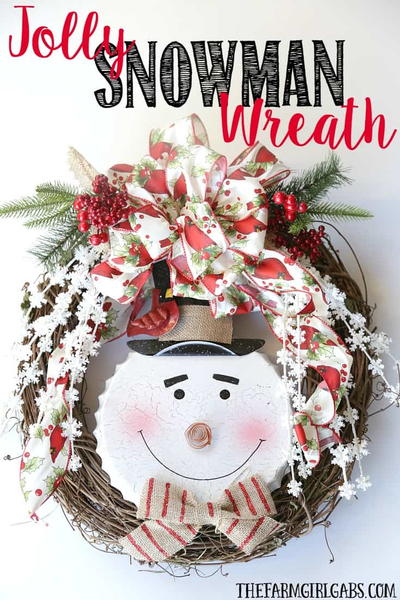
1. Festive Fabric Wreath:
Using similar shades of red and green fabric from your quilt project, create a beautiful fabric wreath to hang on your door or wall. Cut the fabric into strips and tie them around a foam wreath form, layering the strips to create a lush, full wreath. Add embellishments like glittery ornaments or ribbon for an extra touch of holiday cheer.
2. Ornament Garland:
Take your leftover fabric scraps and turn them into a charming ornament garland. Cut the fabric into small squares or circles, then sew or glue them onto a string of twine or ribbon. Add some beads or bells in between each fabric ornament for a whimsical touch. Hang your garland on your mantel or staircase for a festive pop of color.
3. Handmade Christmas Stockings:
Put your quilting skills to the test by creating personalized Christmas stockings for your family members. Use coordinating fabrics to sew stockings in different sizes and shapes, adding embellishments like appliqués, buttons, or embroidery for a unique touch. Hang them by the fireplace and fill them with goodies on Christmas morning.
These Christmas crafts are a perfect way to continue spreading holiday cheer throughout your home. Happy crafting!
Read NextCrochet Heart Santa Ornament


