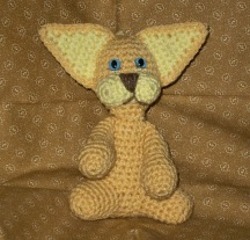
Clyde the Golden Cat
Clyde the Golden Cat is a super cool crochet cat. Use this free crochet pattern to make this crochet amigurumi doll for the cool kids in your life.

Materials:
- Worsted weight yarn- about 3 1/2 oz. MC
- Small amount CC yarn.
- Scrap of color of choice for nose
- Crochet hook size F (US)
- Polyfill
- 12 mm safety cat eyes (Optional)
- Yarn needle
Gauge: 4 sc = 1 inch. 4 sc rows = 1 inch.
Size: About 7 inches tall.
Notes: Do not join rounds unless indicated. Mark the beginning of each round with a stitch marker or scrap of yarn.
Weave in loose ends as work progresses. Use MC yarn except where noted in pattern.
Instructions:
Head
Rnd 1: Starting at top of head, ch 2, 6 sc in 2nd ch from hook. (6 sc)
Rnd 2: 2 sc in each sc around. (12)
Rnd 3: (Sc in next sc, 2 sc in next sc) repeat around. (18 sc)
Rnd 4: Sc in each sc around.
Rnd 5: (Sc in each next 2 sc, 2 sc in next sc) repeat around. (24 sc)
Rnd 6: Sc in each sc around.
Rnd 7: (Sc in each next 5 sc, 2 sc in next sc) repeat around. (28 sc)
Rnds 8 - 9: Sc in each sc around.
Rnd 10: (Sc in each next 5 sc, decrease 1 sc over next 2 sc) repeat around. (24 sc)
***If using safety cat eyes, insert them now over rnds 7 - 8. ***
Rnd 11: (Sc in each next 2 sc, decrease 1 sc over next 2 sc) repeat around. (18 sc)
Rnd 12: Sc in each sc around.
Rnd 13: (Sc in next sc, decrease 1 sc over next 2 sc) repeat around, join with a sl st in next sc. Fasten off. (12 sc)
Stuff head firmly.
Body
Rnd 1: Starting at bottom of body, ch 2, 6 sc in 2n ch from hook. (6 sc)
Rnd 2: 2 sc in each sc around. (12 sc)
Rnd 3: (Sc in next sc, 2 sc in next sc) repeat around. (18 sc)
Rnd 4: (Sc in each next 2 sc, 2 sc in next) repeat around. (24 sc)
Rnds 5 - 9: Sc in each sc around.
Rnd 10: (Sc in each next 4 sc, decrease 1 sc over next 2 sc) repeat around.
Rnds 11 - 13: Sc in each sc around.
Rnd 14: (Sc in each next 3 sc, decrease 1 sc over next 2 sc) repeat around. (16 sc)
Rnds 15 - 17: Sc in each sc around.
Rnd 18: (Sc in each next 2 sc, decrease 1 sc over next 2 sc) repeat around, join with a sl st in next sc. Leaving a length of yarn for sewing, fasten off. (12 sc)
Stuff body firmly. With the remaining length of yarn, sew head and body sections together.
Muzzle (Make 2)
Rnd 1: With CC, ch 2, 6 sc in 2nd ch from hook. (6 sc)
Rnd 2: 2 sc in each sc around. (12 sc)
Rnds 3 -4: Sc in each sc around. At the end of rnd 4, join with a sl st in next sc, fasten off.
Holding the 2 muzzle sections side by side with wrong sides facing, sew the 2 muzzle sections together over 4 sc only to form the muzzle. Sew the muzzle to rnds 9 - 12 of center of face under eyes (if attached). Stuff muzzle sections equally before closing. With length of yarn, embroider nose and mouth onto muzzle.
Ears (Make 2 with MC yarn and 2 with CC yarn)
Row 1: Starting at top of ear ch 2, 2 sc in 2nd ch from hook, ch 1, turn. (2 sc)
Row 2: Sc in each sc across, ch 1, turn.
Row 3: 2 sc in each sc across, ch 1, turn. (4 sc)
Row 4: Sc in each sc across, ch 1, turn.
Row 5: 2 sc in first sc, sc in each sc to last sc, 2 sc in last sc, ch 1, turn. (6 sc).
Row 6: Sc in each sc across, ch 1, turn.
Row 7: 2 sc in first sc, sc in each sc to last sc, 2 sc in last sc, ch 1, turn. (8 sc)
Row 8: Sc in each sc across, ch 1, turn.
Row 9: Sc in each sc across, fasten off.
Joining ears: Place one CC ear section over one MC ear piece section and sc them together by working through both pieces.
Join MC yarn at side edge of row 9 of ear, ch 1, sc in same place as joining, sc evenly up side edge of ear to top point, 5 sc in top point, sc evenly down side of ear to opposite side of row 9, sl sl in same place as last sc made, leaving a length of yarn for sewing, fasten off.
With remaining length of yarn, sew opening at bottom of ear closed, sew ears to top of head.
Feet (Make 2)
Rnd 1: Ch 4, 2 sc in 2nd ch from hook, sc in next ch, 3 sc in last ch, working
around into opposite side of starting ch - sc in next 2 chs. (8 sc)
Rnd 2: 2 sc in each of next 2 sc, sc in next sc, 2 sc in each of next 3 sc, sc in
next sc, 2 sc in next sc. (14 sc)
Rnds 3 - 5: Sc in each sc around.
Rnd 6: (Sc in each of next 6 sc, 2 sc in next sc) repeat around. (16 sc)
Rnds 7 - 8: Sc in each sc around. At the end of rnd 8, join with a sl st in next sc, fasten off.
Stuff feet firmly and sew them over rnds 5 - 9 of front of body.
Arms (Make 2)
Rnd 1: Ch 2, 6 sc in 2nd ch from hook. (6 sc)
Rnd 2: 2 sc in each sc around. (12 sc)
Rnd 3: (Sc in each of next 3 sc, 3 sc in next sc) repeat around. (15 sc)
Rnds 4 - 5: Sc in each sc around.
Rnd 6: (Sc in each of next 6 sc, decrease 1 sc over next 2 sc) repeat around. (12
sc)
Rnd 7: (Sc in each of next 2 sc, decrease 1 sc over next 2 sc) repeat around. (9 sc)
Rnds 8 - 13: Sc in each sc around. At the end of rnd 13, join with a sl st in next
sc, leaving a length of yarn for sewing, fasten off.
Stuff arm firmly. With the remaining length of yarn, sew opening closed. Sew arms to rnds 14 - 18 at sides of body.
Tail
Rnd 1: Starting at tip of tail with CC yarn, ch 2, 6 sc in 2nd ch from hook. (6 sc)
Rnd 2: (Sc in each of next 2 sc, 2 sc in next sc) repeat around. (8 sc)
Rnds 3 - 5: Sc in each sc around.
Rnd 6: Sc in next 7 sc, 2 sc in last sc. (9 sc)
Rnd 7: Sc in each sc around, changing to MC yarn in last step of last sc, break off CC yarn.
Rnds 8 - 11: Sc in each sc around.
Rnd 12: Sc in next 6 sc, 2 sc in last sc. (10 sc)
***Stuff tail moderately but not firmly and continue to add stuffing as work progresses. ***
Rnds 13 - 18: Sc in each sc around.
Rnd 19: Sc in next 9 sc, 2 sc in last sc. (11 sc)
Rnds 20 - 22: Sc in each sc around.
Rnd 23: Sc in next 10 sc, 2 sc in last sc. (12 sc)
Rnd 24: Sc in each sc around.
Rnd 25: (Sc in each of next 5 sc, 2 sc in next sc) repeat around. Join with a sl st in next sc, leaving a length of yarn for sewing, fasten off. (14 sc)
Add more stuffing to tail to complete stuffing. With the remaining length of yarn, sew tail to center of back over rnds 4 - 10.
Weave in any remaining loose ends.
Done!!!
**********
Copyright 2009 Stormy'z Crochet. Do not distribute or sell pattern to others.
Do not post it on the internet or claim it as your own. You may sell items you
make with this pattern at craft fairs or to friends and family but please do not
sell items made with this pattern on the internet without prior permission.
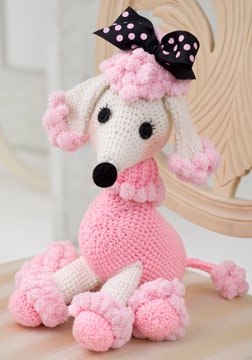
Read NextPomp Poodle in Pink
Your Recently Viewed Projects
leannmlewis 694222 7
Nov 04, 2011
Hello, Ive been looking at amigurumi patterns for an hour, I ADORE this one! Going to be making it for sure! Thanks
Madelyn
Apr 05, 2010
La Lobita says I don't think the idea was for it to look like an actual cat - there are many such patterns available. I do think for my use that the ears are a little much but that's an easy fix - just make them smaller. Bottom line - I think it's cute!
Char55
Mar 24, 2010
That doesn't even look like a cat...looks more like a demented chihuahua...cats do not have ears twice the size of their heads.
Report Inappropriate Comment
Are you sure you would like to report this comment? It will be flagged for our moderators to take action.
Thank you for taking the time to improve the content on our site.

