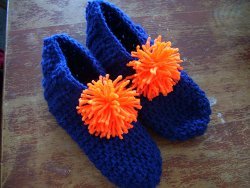
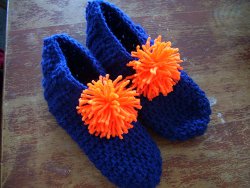
Orange and Blue Crochet Slippers
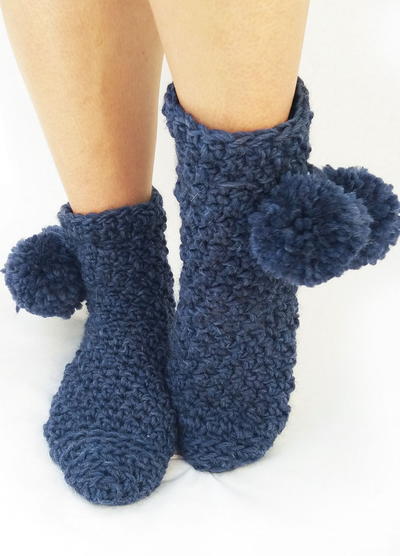
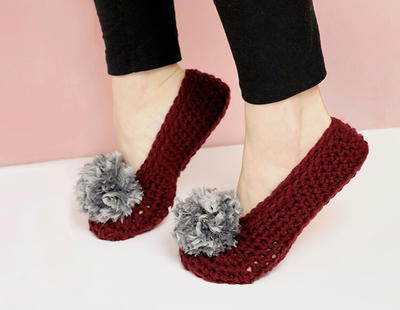
Make these Orange and Blue Crochet Slippers to help keep your feet nice and warm in the colder months. Simple crochet slipper patterns like this are fun and easy to make, and make great gifts for the holidays. Mix and match colors to create your own pair of fun slippers. The pom poms on these slippers make them extra fun to wear around the house, and when made with green and red yarns, these slippers would be so fun to wear on Christmas morning. Don't forget to make a pair for everyone in your family!
Materials:
- 2 skeins of yarn in the colors of your choice
- H crochet hook
Instructions:
These are for a size 9 women's shoe. See note at bottom to adjust size.
-
Special Note: Beginning Ch 2 made in magic circle counts as a 1 hdc.
-
Row 1: Make a magic circle. Ch 2, 5 hdc in magic circle. Draw magic circle tight. Slip st in 2nd st of beg chain. (6 hdc)
-
Row 2: Ch 2. Work 2 hdc in each hdc around. Join with slip stitch to join in beg hdc. (12 hdc)
-
Row 3: Ch 2. Work 2 hdc in each hdc around. Join with sl stitch to join in beg hdc. (24 hdc)
-
Rows 4 -11: Ch 2. Work 1 hdc in each hdc around. Join each row with a slip st in beg hdc. (24 hdc each round)
-
Row 12: Ch 2. Work 1 hdc in each hdc around. DO NOT JOIN. Ch 2 and turn.
-
Row 13 - 21: Ch 2. Work 1 hdc in each hdc around. Do not fasten off.
-
Fold ends of the row together to form closing heel. I used a slip stitch to close the seam or you can sew it closed. (If you choose to sew it closed, fasten off Row 21 leaving a long enough tail of yarn to sew with.)
-
Attach with slip stitch either at the heel or at the center front and sc in each st around for a finished edge. Join with sl st and fasten off.
-
Make pompom to match or contrast and tie at center front.
- Weave in loose ends.
Notes:
- Adjust number of rows as needed to get the needed shoe size. I made the slipper 1/2 -1 inch smaller than the shoe size in inches because these stretch. Adjust by even number of rows to be able to close the heel from the outside of the slipper.
- These will be very slippery when worn on bare floors, so take care.
Your Recently Viewed Projects
mulberrygalprinces s
Jul 13, 2018
What a very nice project. I read the directions and they are very easy to follow. They are basic stitches so anyone should be able to follow them. I like the idea of making them in college colors to take along. The ones shown look like the U of Florida colors.
tstitchesandcrafts 7879506
Nov 10, 2017
Fabric Paint makes great non-skid designs on bottom of slippers.
princess6860504
Jun 01, 2017
I think these slippers are a cool alternative to beginner or advanced beginner crocheters instead of the usual sometimes boring scarf. These can be made in your school colors! What a fun gift to send with your new college student to wear in the dorms. Now, you could also do a simple stitch along the bottom of the slipper attaching a piece of leather that has been cut out using one of your shoes as a template. Or, trace around your sock foot. You can find that leather at the fabric store.
alikennedy 8833644
Jan 09, 2015
Can you please convert this pattern to a Knitted Pattern as I do not crochet but like the look of these slippers
FaveCrafts Editor JL
Jan 12, 2015
Hi there, thanks for your comment. We actually have a ton of knit slipper patterns here on FaveCrafts. Simply click on the Knitting category on the right hand side of this page and then click on the Knit Socks and Slippers subcategory. Check out our pattern for Grandma's Knitted Slippers - they're a reader favorite! Thanks! - Julia from FaveCrafts
sandrabcreech 3141 829
May 21, 2014
Does this slipper pattern use only a single strand of 4 ply yarn? Other slippers I've made call for a double strand.
Melissa Ryan
May 21, 2014
Hi Sandrabcreech--Thanks for the comment. There was nothing to indicate that this patterns uses a double strand, but you can try it and see how the pattern works out. Keep in mind that if you do use a double strand, your slipper will be bigger than indicated. Thanks!--FaveCrafts Editor
pepsibanks 2821975
Mar 14, 2013
I made these as Christmas gifts. Work up really fast and they are warm. I used the non-slips strips for the bathtub on the bottom of these to prevent slipping. Worked well too!
bborman 4298078
Dec 27, 2012
Are these really made with hdc's? I am one the middle of making one and it seems really small. I am wondering if it should actually be double crochet.
debbiekdonnelly 19 29347
Mar 05, 2016
have made a few different pairs of slippers they were very small I had to add stitches to start
Sbodine74
Mar 02, 2012
I did a pattern and had no clue what magic circle was. You aren't making a knot. I chained two and worked 5 hdc crochet in the chain (icircle) then I pulled the chain closed to tighten. Hard to explain you tube has the video
Melissa Ryan
Nov 08, 2012
Hi Sbodine74, here's a tutorial on how to crochet the magic circle: www.allfreecrochet.com/Tutorials/How-to-Crochet-the-Magic-Circle
butters720 9198416
Feb 06, 2012
I can follow everything until this part: "Fold ends of the row together to form closing heel. I used a slip stitch to close the seam or you can sew it closed. (If you choose to sew it closed, fasten off Row 21 leaving a long enough tail of yarn to sew with.) Attach with slip stitch either at the heel or at the center front and sc in each st around for a finished edge. Join with sl st and fasten off". Since you start with a magic circle, it appears that you are crocheting in the round for this pattern. I am not certain where or how you fold ends in (what ends) or - in the next sentence - what you are attaching. this part confuses me. Can you explain further?
kgochenour73
Jan 09, 2012
I made these and they are very easy and fast. I did not do the pom poms. I did a front and back post double crochet (of course there was not a front and back post in this pattern to do the stitch in, so I eyeballed it and picked a stitch to create the look of front and back post) around the top, then one row of single crochet. I made a chain rope and weaved that through the double crocheted front and back post stitch and tied it off in a bow . They came out very cute and all the my son's girlfriends and the girlfriends friends are asking for them. Unfortunately I don't have enough hands to make them all.
1Mom
Jan 06, 2012
This pattern is very easy to do! I am hung up however and wondering if someone could help me. I'm stuck on row 12 and 13-21, row 12 at end says to ch2 and turn then 13 says to ch2 so is it 4chs? also do I turn every time so I'm not joining the ends? I hope someone can help me, I'm a beginner and just trying out new things. Thanks
JennyBee1
Oct 20, 2011
@tweety2230, Please contact the original pattern designer to determine the exact type of yarn that was originally used for this pattern. --Editors of FaveCrafts
CreativityGoddess
Oct 04, 2011
Hi all- Here is information on how to crochet the magic circle: http://www.allfreecrochet.com/Tutorials/How-to-Crochet-the-Magic-Circle/ Hope this helps! -The editors of FaveCrafts
KayMarie
Oct 01, 2011
I still don't understand what a magic circle is. I understand about the first loop, but it doesn't sound as if it is certain that this is what it is. Please let me know what a Magic Circle is. Strange they don't explain it, and I can't seem to find anything reference to it anywhere.
Melissa Ryan
Nov 08, 2012
Hi @KayMarie, here's a tutorial on how to crochet the magic circle: www.allfreecrochet.com/Tutorials/How-to-Crochet-the-Magic-Circle
Sylversiddy
Mar 12, 2011
I think what they are calling a magic circle is when you make your first loop to crochet, but instead of tying it toward the ball of yarn, you tie it toward the end of hat you will be working and the loop will close tighter when you pull the thread. I need a picture to explain better. Sorry I can't be clearer, but I hope it helps.
Report Inappropriate Comment
Are you sure you would like to report this comment? It will be flagged for our moderators to take action.
Thank you for taking the time to improve the content on our site.

