Altered Easter Egg
Get the look of vintage Easter decor with this simple Altered Easter Egg tutorial. By taking an old metal egg and transforming it, you can have a beautiful gift or decoration that's perfect for the spring. This beautiful altered egg makes a wonderful gift for a loved one, and when filled with yummy treats, is also great for kids of all ages. A little bit of Mod Podge can go a long way with this vintage Easter egg tutorial.

Materials:
- Metal eggs
- Spray paint
- Mod Podge
- Silver glitter
- Bow and twine
- Glue gun and glue sticks
- Embellishments (feathers, paper roses)
Instructions:
-
I spray painted it to give it a good base coat. I just used a cream color.

-
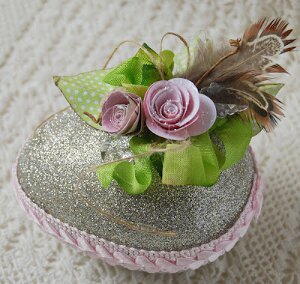
After the egg is dry, I covered it with Mod Podge and sprinkled it with a pretty silver glitter from Martha Stewart. Just choose whatever color pleases you!
-
A double bow on each side and tie it in the middle with twine. Don't worry if it isn't perfect!

-
For this egg I did use my glue gun to adhere everything. I love to layer my embellishments, so this is the order I built this egg in. First hot glue the bow/twine to the egg. I glued it a bit off center towards the fattest part of the egg.
-
I cut 3 leaves using my Cricut and the Flower Shoppe cartridge.

-
I had a few feathers in my stash I knew I wanted to add.....after all it IS an egg! And a few acrylic pieces from Prima. I like them because they add a subtle look to the egg without overpowering it.

-
And lastly, I add my flowers. The flowers are once again from the Sizzix 3-D flowers die.

Read NextEaster Cardboard DIY Wreath

