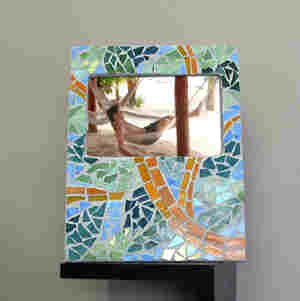
Mosaic Rainforest Frame
This handmade picture frame from Diamond Tech brings the exciting tropical lushness of the rainforest into your home. The terrific colorful background and texture makes a great back drop for your vacation photos.

Materials:
- 1 Wooden Frame (MSI Product UPC 652695-67000-8)
- 2 packages of Jennifer’s Mosaics Assortment Glass Chips (361J & 361 IR)
- 8 oz. Grey Sanded Grout
- Soft Cloth or Scrubby
- Latex Glove
- Safety Glasses
- Mosaic Glue
- Pen
- Carbon Paper
- Mixing Spoon
- Disposable or Plastic Bowl
- Wheeled Glass Nippers
Steps:
- Lightly wipe wooden frame with a soft cloth or paper towel to remove surface dust or dirt. Use a foam brush to paint frame with a light blue paint. For a more antiqued look, use a cloth and lightly wipe surface of frame before paint dries. When satisfied with the look, allow paint to dry.
- When dry, transfer the design onto the wooden frame, by taping carbon transfer paper and pattern in place, tracing over the pattern with a pen.
- Remove the pattern and carbon paper.
- Use a glass nipping tool, nip the stained glass squares into various sizes and shapes. Use nipped pieces to fill in the various sections of the design, leave 1/8” space between pieces for grout. Continue to nip and place glass, until frame is completely covered and you are happy with the look. Lift each piece and apply a thin layer of glue to back and press firmly into place.
- Allow glue to dry.
- Following the manufacturer’s instructions, make one cup of grey grout.
- Wearing latex glove, spread grout on to the frame surface making sure that grout is pressed into all the nooks and crannies between the glass pieces. Wait about 15 minutes for grout to set.
- Gently wipe away excess grout using a scrubby, taking care not to pull away grout from between glass pieces. It is very important to remove any grout on tile surfaces before grout is completely dry.
- Use a soft cloth to buff glass to a clean shine. Allow 24 hours for mosaic piece to dry thoroughly.
Read NextCottage Slat Picture Frame

