Fabric Button Christmas Ornaments
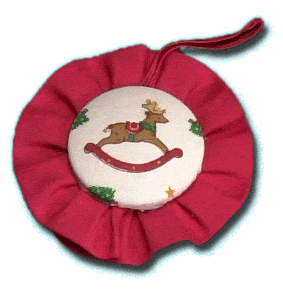
Cover buttons with printed Christmas fabrics, embroidered holiday designs and more to create lovely handmade ornaments. You can paint fabric covered buttons or add beads for other embellishment ideas. Use these ornaments to decorate the tree or give as gifts to family and friends. You'll love how simple and easy these Fabric Button Christmas Ornaments are to make.

Materials:
- 6" Square fabric, woven or knit
- 5" Square lightweight non-woven fusible interfacing
- Dritz Cover Buttons - Size 100 (2½"), size 75 (1 7/8"), or size 60 (1½")
- 8" Piece of ruffled trim
- Felt, small piece to cover back of button
- 6" Piece of soutache braid for hanger
- Hot glue gun
- Fabric marking pen or dressmaker pencil
- Scissors
- Tissue paper
Instructions:
-
Using pliers, remove wire shank from back of button cover by pinching shank together and pulling it out.

-
Fuse interfacing to wrong side of fabric. Interfacing is needed to reinforce lightweight, knit and slippery fabrics and to stabilize fabrics that will be embellished with decorative machine stitching. It also helps to prevent shadow-through of button shell.
-
Cut out button pattern from back of package or trace off shape on tissue paper, making a full circle. Place pattern on right side of fabric and center over design. Cut out fabric circle.

-
Center fabric over button cover. Working from side to side and top to bottom, hook fabric onto teeth. Then continue working around button, hooking fabric onto teeth and stretching fabric for a tight smooth fit (Figure 3). Tip: Use a pencil eraser to help catch fabric on teeth.

-
Mark top of button on back side. Fold soutache braid in half and hook ends of braid into teeth at top of button (Figure 4). Or, if desired, glue ends of braid to backplate after it's attached to the button.

-
Trace shape of backplate on felt; cut out. Set aside.
-
Snap backplate to button with imprint facing you. If backplate is difficult to snap on, use end of thread spool to snap backplate in place (Figure 5).

-
Hot glue ruffled trim to back of button. Start at top and work around edge of button (Figure 6). Overlap ends of ruffle.

- Hot glue felt to back of button.
Read NextChristmas Cone Ornament

