This project was submitted by one of our readers, just like you.
Diy Sensory Mat Tutorial
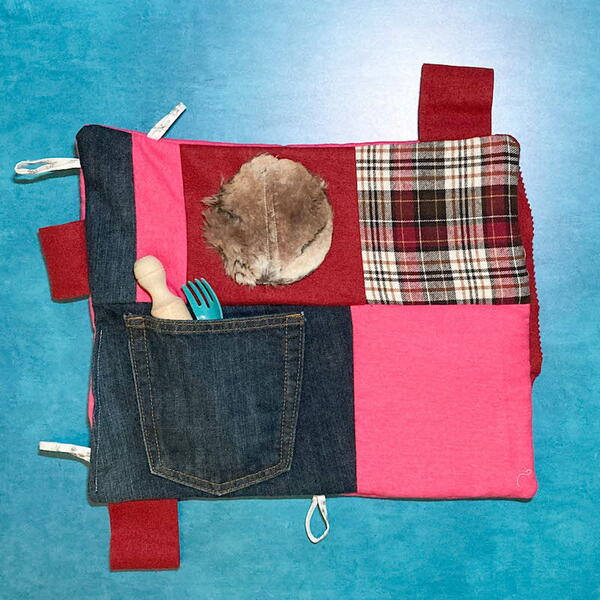
Sensory mats are small, lap-sized (or table-top sized) projects that provide safe tactile and sensory stimulation for adults with dementia and Alzheimer’s disease, as well as for some neurodiverse children. If you’d like to donate your sensory mat or find more ideas for sewing for charity, check out Underground Crafter’s Ultimate Guide to Sewing for Charity for Beginners or search “sensory mat” on VolunteerMatch.org. As with all charity sewing, be sure to check with the organization you plan to donate to about any restrictions. Some do not accept projects with buttons, for example.
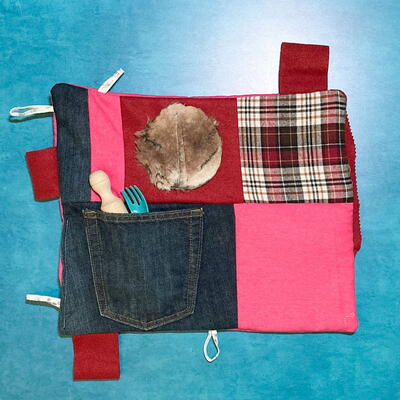
The sensory elements of this particular sensory mat include:
- Fabrics with different fiber content that have different tactile experiences.
- An Insul-Bright interior that makes a “crinkly” noise.
- Fabric tape/bias tape tags of different sizes for fingers to explore.
- A removable piece of Faux Fur attached to the rest of the mat using a hook and loop fastener.
- A weighted pouch filled with stuffing beads that is “squishable.”
- A denim pocket that can hold additional items.
Finished Size
- Approximately 15” across x 13” tall.
Project TypeMake a Project
Time to CompleteWeekend project
Sewn byBoth Hand and Machine

Materials List
-
Tools
- Sewing machine with standard presser foot and walking foot for sewing over thick seams.
- Cutting mat, 45 mm rotary cutter, and acrylic ruler.
- Fabric shears.
- Pinking shears.
- Quilting pins and pincushion.
- Denim or jeans needle.
- Iron and iron-safe surface.
- Basic sewing supplies (seam ripper, thread snips, etc.).
-
Fabric in a variety of textures and fiber contents. For my version, I used:
- 1/2 yard of cotton flannel in Fuchsia
- 1/4 yard of cotton flannel in Plaid
- 1/4 yard of polar fleece in Burgundy
- A sample of faux fur in Fox
- The back pocket and some scraps from a pair of upcycled jeans. Get 11 tips for upcycling jeans here.
- Several small pieces of fabric tape I had left over from making the DIY Tag Blanket. Visit that post for instructions on how to make fabric tape with a Bias Tape Maker, or substitute a small amount of single or double fold bias tape.
- 100% cotton thread in your choice of color for stitching and bobbin.
- Hook and loop fastener, such as VELCRO ® Brand Sleek & Thin™ for Fabrics.
- Stuffing beads such as Fairfield Poly Pellets.
- Warm Company Insul-Bright.
- Small kitchen items to include in the pocket. I used a mini rolling pin and a plastic fork; plastic measuring spoons are another option.
This project is featured in our National Craft Month 2023 celebration! Discover a new project (plus giveaways!) throughout the month of March!National Craft Month 2023
Instructions
Prepare for sewing
-
Iron the fabric yardage to press out wrinkles and folds.
-
Cut fabric pieces for front. You’ll need:
- 1 rectangular piece including a back pocket of a pair of jeans, with as much space around the pocket as possible. Measure this piece after cutting it out.
- 2 pieces of the cotton flannel in Fuchsia cut to 9” square each (or the same height as your jeans pocket).
- 1 piece of cotton flannel in Plaid cut to 6.5” square.
- 1 piece of Polar Fleece in Burgundy cut to 6.5” square.
- 1 strip of each of these fabrics (cotton flannel, plaid cotton flannel, polar fleece, and denim) cut to approximately 2.5” by the remaining width of fabric.
-
Cut fabric and Insul-Bright for the back. You’ll need 1 piece each of the cotton flannel in Fuchsia and Insul-Bright, each cut to approximately 17” x 14”.
Prepare Removable Fur Square
-
Position the hook and loop fastener across the diameter or length of the faux fur sample piece. Cut the hook and loop fastener so that it is slightly shorter than the diameter or length of the sample piece.
-
Separate the pieces of the hook and loop fastener. Sew the piece with the hook side up at the center of the polar fleece square, leaving at least 1” on all sides. Sew the piece with the loop side up to the wrong side at the center of the faux fur sample piece. Position the hook and loop pieces together to attach the faux fur to the polar fleece square.
Prepare Weighted Pouch
-
Pin together 2 square pieces of cotton flannel with right (front) sides together. Sew along 3 sides with a 1/4" seam allowance.
-
Clip bottom corners. Turn right side out. Position cotton flannel pouch next to jeans pocket with right (front) sides together. Pin in position.
-
Sew pieces together with 1/4" seam allowance.
-
Pour stuffing beads into cotton flannel pouch. IMPORTANT: Fill the pouch only half way, or less. Otherwise, it will be very difficult to sew the rest of the project.
Assemble Front of Sensory Mat
-
With right (front) sides together, sew the cotton flannel plaid piece to the polar fleece with a 1/4" seam allowance. Sew additional 2-1/2" strips of any fabric to these pieces until this row is slightly longer than the width of the row formed by the jeans pocket and cotton flannel pouch. Finger press all seams flat or towards the heavier fabric.
-
Pin the right (front) sides of these two rows together, being careful to push the stuffing beads towards the side of the pouch that is unpinned.
-
Starting at the side with the pouch, and making sure that all stuffing beads are away from the pins and out of the path of your sewing needle, sew these rows together with a 1/4" seam allowance.
-
Finger press all seams flat. Pin an additional 2-1/2" strip of the polar fleece to the side with the weighted pouch. Starting at the side with the pouch, and making sure that all stuffing beads are away from the pins and out of the path of your sewing needle, sew together with a 1/4" seam allowance.
Change to Walking Foot
-
To finish your project, you will need to change to your walking foot following the instructions from your sewing machine manufacturer.
Assemble Sensory Mat
-
Trim 2 to 3 pieces of 2-1/2" strips of polar fleece to 4” to 6” long. Trim 2 to 4 pieces of fabric tape or bias tape to 5” long.
-
Fold pieces of polar fleece and bias/fabric tape so that the short, raw edges are together. Pin to the right (front) side of your Sensory Mat with the raw edge attached to the outer edge. Do not attach any polar fleece or bias/fabric tape pieces to the weighted pouch, to the extra piece of polar fleece on the side, or to any seams.
-
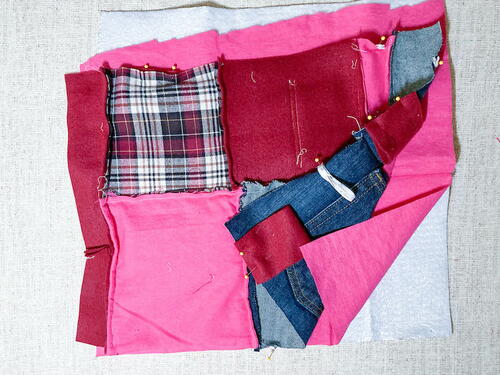
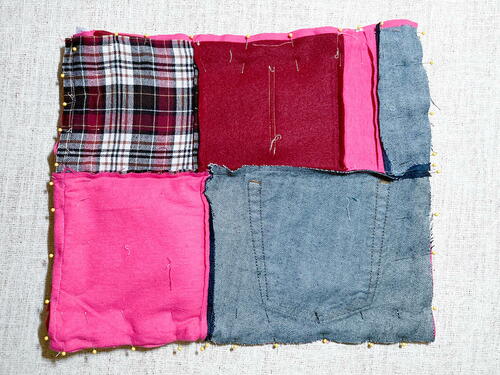
Once you are satisfied with the positions, layer the project together as follows. Position the Insul-Bright at the bottom (there is no right or wrong side). Position the cotton flannel piece for the back on top of the Insul-Bright with the right (front) side up. Position the front piece with the right side down (facing the cotton flannel). Your pieces of Insul-Bright and cotton flannel for the back may be larger than your front piece.
-
Pin the long polar fleece strip (shown at left in the photo above) towards the inside as shown in the photo below. Trim the Insul-Bright and cotton flannel for the back if necessary.
-
Using your walking foot – and being careful to move the stuffing beads away from the needle when sewing around the pouch – sew around the short edge with the pouch and both long sides using a 1/4" seam allowance and reinforcing your start and end stitches. On the final short edge, leave an opening approximately 4” long.
-
Trim any excess fabric outside of the seam allowance and clip the corners.
-
Using the opening, pull the right (front) sides of the sensory mat out. With the pinking shears, trim the strip of Polar Fleece as desired. Pin the seam opening and sew closed with a top stitch using reinforcement stitches at start and end.
-
Need more photos to guide you through this project? Read the full tutorial here.


