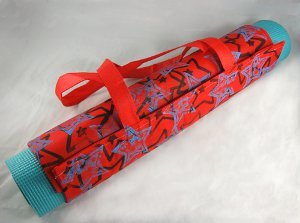
Star Studded Yoga Mat Tote
This Star Studded Yoga Mat Tote from Carmen Flores Tanis is made from reuseable folding shopping bags. Who would have thought that crafts made from recycled items could be so useful?

Materials:
- One large cloth tote bag (the kind that are shaped like paper grocery bags with a flat bottom work the best. The bag just needs to be tall enough to wrap once around your mat with about a 1" overlap. The one we used measured 20" wide x 16" tall)
- 3 Pieces Velcro - hook & loop
- Thread
- Sewing machine
- Scissors
- Pins
- Acrylic paint
- Rubber stamp
- Old baking dish or plate for mixing paint
- Brayer (a Popsicle stick or an old credit card will also work fine)
Instructions:
-
Lay the bag out flat so that the the folded bottom of the bag faces down toward table. The side facing up will be the front face of your sling tote. That bottom material which is folded underneath in the picture will be on the inside, next to the mat, whenever you wrap the bag around the mat. It will get sewn flat in place later when you add the Velcro.

-
Moving to the other end with the strappy handles, leave the handle on the top layer alone and cut off the handle on the bottom layer at both ends. Set aside.

-
Now you'll sew the bag closed. Pin the opening of the bag together and straight stitch about 1/2" from the edge.

-
Time for the Velcro. Wrap the bag around the mat and position the three hook parts of the Velcro along the underside of the edge with the handle. Pin in place. Position the corresponding Velcro loop pieces along the other edge of the bag so that they align with the hook pieces. Pin. Sew all six Velcro pieces in place.

-
Here we add the second handle which you had set aside earlier. Position the second handle about 4" from the edge of the "unhandled" side of the bag (this measurement of 4" might vary depending on the dimensions of your particular bag - you want to attach the handle where it won't interfere with the velcro when the bag is wrapped closed. Adjust the measurement as necessary). Pin in place and then sew with a straight stitch. You'll be sewing through the bottom flap which we'd positioned in step #1 so go slow through all those thicknesses of fabric.

-
Now comes the fun decorating part.

-
Pour some acrylic paint onto a flat surface like a plate or old baking dish. Spread out the paint into a thin layer (this is where the brayer comes in handy but you can use an old credit card or popsicle stick instead). Take your choice of rubber stamp and use the acrylic paint to stamp all over the bag.

-
Add a second color if you like. We used a sky blue here to match the yoga mat.

- That's it! Let it dry throughly then wrap around your yoga mat. Enjoy!
Read NextSimple Book Bag Sewing Pattern

