An Apron to Dye For
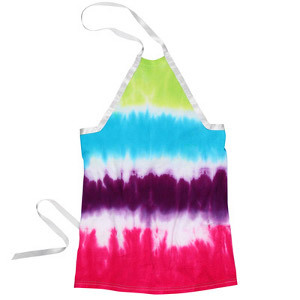
Protect your clothes from the perils of messy crafting and cooking with a tie-dyed apron from I Love to Create. Follow these simple instructions for tie dye aprons to make colorful gifts for friends and family who love to craft and create. It's An Apron to Dye For!

Materials:
- Tulip® One-Step Tie-Dye Kit™ - Luau
- Jerzees® T-shirt –100% cotton – White
- Sewing machine
- Scissors
- Plastic tablecloth
- Thread to match
- Ribbon – ¾" – White
- Pattern
Find this project and many more in our free eBook, How to Make Tie Dye Shirts, Decor, and More: 18 Tie Dye Patterns!
Instructions:
-
Prewash tee without fabric softener. Do not dry.
-
Cover work surface with plastic tablecloth.
-
Lay tee flat on prepared work surface.
-
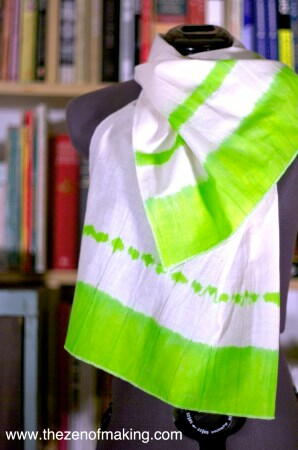
Apply dye in a straight line across tee as shown. (Remember dye will gradually bleed up so leave room for white to show through.)
-
Cover tee with plastic tablecloth and let set for 6-8 hours.
-
Wash and dry following instructions on tie-dye package.
-
Follow diagram to cut T-shirt into an apron: Lay shirt flat with back facing up. Cut across shoulders and up the back of the shirt.
-
Open the shirt and lay it out flat.
-
Fold the entire shirt in half, with the front of the shirt on the fold.
-
Cut through both layers from the neck opening, under the arm, and across to the back of the shirt.
-
Unfold the shirt flat, to reveal the apron.
-
Lay ribbon on apron running from neck to side to determine length including added length for waist and neck ties.
-
Cut two equal pieces and sew to both sides of apron to create apron string and ties at neck.
Your Recently Viewed Projects
Report Inappropriate Comment
Are you sure you would like to report this comment? It will be flagged for our moderators to take action.
Thank you for taking the time to improve the content on our site.

