Shadow Box Picture Frame
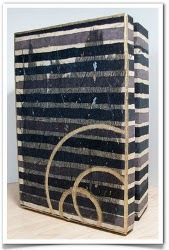
This Shadow Box Picture Frame from Lisa Fulmer is sure to become a keepsake! You'll love this free craft tutorial - it's a great way to show your creativity.

Materials:
- Ready-to-Go! Blank Board Shadow Box
- Collage paper
- Translucent tissue paper
- Matte gel medium
- Paintbrush
- Ruler
- Gold leaf pen
- Foam pop dots
- Digital photos
- White cardstock
- Black marker
Instructions:
- Cut or tear collage paper into long strips of various widths from 1" up to 4" - choose whatever widths work the best for the printed pattern on the paper. TIP: place thinner strips at the top and bottom of the box to make it easier to wrap around into the corners inside, and use wider strip(s) in the center of the box.
- Brush a thin coat of matte gel medium on the outside of the box (use as a collage adhesive) and while it's still wet, press the strips to the outside of the box, smooth them out, overlap them a little, covering the whole surface and wrapping the paper around the spine, and around the edges of the box and up under the inside lip of the framed area inside. Allow to dry.
- Use another thin coat of matte gel medium to collage the front of the box with torn piece(s) of translucent tissue paper, allow to dry.
- Rim the edges of the box with a gold leafing pen, mark against a ruler to keep the edge lines straight and crisp. TIP - keep the ruler in place for a few extra seconds after marking your line to let the ink dry...moving the ruler away too quickly can smudge the ink.
- Trace around circle templates or jar lids with the gold leaf pen to create random curves on the cover to embellish, allow ink to dry.
- Seal the whole paper-covered surface of the box with a thin coat of matte gel medium, allow to dry.
- Print your photos on to white card stock, trim to size with a white border, and tip the edges with a black marker.
- Attach the photos inside the frame with foam pop dots, so they "float."

Read NextFaux Stained-Glass Butterfly Craft

