Candy Apple Necklace
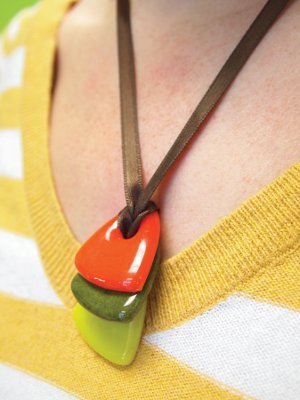
Great for year-round accessorizing, this Candy Apple Necklace is a great way to brighten up your outfit. With bright green and orange pendants, this colorful statement necklace is sure to take any outfit from drab to fab! You could even make a variety of necklaces in all your favorite colors so you always have something fun to wear. This colorful necklace also makes a great gift idea for friends or your loyal bridesmaids.

Materials:
- Fuseworks™ Microwave Kiln
- Fuseworks™ Hot Mitts
- Fuseworks™ Kiln Paper
- Fuseworks™ Polar Fuse Casting Molds – Groovy Pendants
- Fuseworks™ Polar Fuse Glass Casting Medium – Fun
- Fuseworks™ Polar Fuse Glass Casting Medium – Primary
- 1 - 20” 3mm Leather Necklace
- Small Mixing Cup
- Mixing Spoon or Small Spatula
Instructions:
-
Add distilled water to the triangular mold until even with the top of the mold. Pour water into a disposable mixing cup. Mix light red Polar Fuse Glass Casting Medium with the water, until mixture is the consistency of wet sand. Pour the slurry into the triangular mold and even it out. Tap the mold to allow the air bubbles to rise to the surface and wick away excess moisture with a paper towel. Place in the freezer for 20 - 30 minutes.
-
Cut a 2” X 2” piece of kiln paper. Remove the lid from the Fuseworks™ Kiln. Place the kiln paper on the kiln base. Remove mold from freezer, remove the triangular piece from the mold and immediately place in the center of the kiln paper. Allow to rest 20 - 30 minutes.
- Carefully set the base with glass inside the microwave and cover with kiln lid. Fuse using the following schedule and using Hot Mitts, carefully lift the lid and check the fusing progress after each interval. If it is not fully fused at the end of the last interval, continue to microwave at 15 second increments until the glass slightly glowing and detail is still visible.
For a 100 watt Microwave:
| Power | Time |
| 50% | 1 minute |
| 60% | 1 minute |
| 70% | 1 minute |
| 80% | 1 minute |
| 90% | 1 minute |
-
Remove kiln from the microwave, using Hot Mitts and place it on a heat resistant surface. Cool the kiln for at least 30 minutes WITH THE LID ON. CAUTION: Removing the lid or peeking under the lid during the cooling stage may result in your piece cracking. Glass remains hot for a long time handle with great care.
-
Repeat steps 1-4 in yellow and in a 60/40 blend of yellow and green. Each additional piece can be mixed, frozen and thawed in the time it takes for the previous piece to cool. Remember to allow kiln to completely cool before reusing.
- When glass has cooled, use a slip-knot to loop a length of leather strapping through the yellow triangle. Layer a green triangle on top of the yellow and use a slip-knot to secure in place. Add the final triangle, red by slide it onto the strapping and securing it with a final slip knot.
Read NextCross Necklace Kids Craft
Your Recently Viewed Projects
Member 8276887
Nov 04, 2013
Does the mold make the opening for the leather strap?
Member 8276887
Nov 04, 2013
Disregard my question ... I looked them up and they do indeed make the opening for the leather strap. Here's a link to an etsy shop: http://www.ebay.com/itm/like/291005306083?lpid=82
Report Inappropriate Comment
Are you sure you would like to report this comment? It will be flagged for our moderators to take action.
Thank you for taking the time to improve the content on our site.

