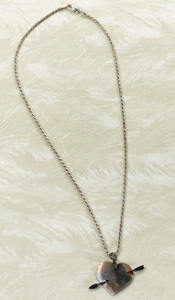
Shot Through the Heart Necklace
Practice a number of techniques with these beaded necklace patterns from Tammy Powley. The Shot Through the Heart Necklace is perfect for an anti-Valentine's Day party or just to show your style.
This project is an excert from The Complete Photo Guide to Jewelry Making by Tammy Powley.

Materials:
- 1" × 1" (2.5 × 2.5 cm) of sterling silver 16-gauge (1.3 mm) sheet
- 2" (5 cm) of 16-gauge (1.3 mm) dead-soft copper wire
- Computer, printer, and paper
- Heart image
- Glue stick
- Scissors
- Rotary tool or drill press
- Large file
- Needle files
- Jeweler’s saw
- Saw blades
- Beeswax or wax compound
- Ball-peen or chasing hammer
- Ring mandrel
- Rawhide hammer
- Anvil
- X and O metal stamps
- Two 5-mm sterling silver jump rings
- One 3-mm sterling silver jump ring
- Chain-nose pliers
- Polisher
- Liver of sulfur
- Baking soda
- Two small bowls of water
- Tweezers
- Paper towels
- Microwave
- Polishing cloth
Instructions:
- Use a computer and printer to print out a heart shape that is about 1" × 1" (2.5 × 2.5 cm). After printing the heart, cut out the paper shape with scissors.
- Use a glue stick to coat the back of the paper heart and adhere it to a piece of sterling sheet.

- With a jeweler’s saw, saw around the heart.

- Use large and needle nose files to file all around the heart to ensure the sides are smooth.
- Pierce a hole in the top/center area of the heart and pierce two extra holes across the heart that will later hold the copper arrow.
- Using an X and an O metal stamp as well as an anvil and hammer, stamp in various spots across the silver heart.
- To create a little bit of a curve in the metal sheet, hold the heart against the widest area of a ring mandrel and use a rawhide hammer to mold the heart around it.
- Take a few inches (centimeters) of copper wire, and insert it through the two holes created in step 5.
- Use a hammer and anvil to flatten both ends of the copper wire (while it is still inserted into the silver heart).
- With a needle file, shape one end of the wire into the arrow point and the other end the feathers.
- Attach a 5-mm jump ring to the center hole in the heart, then add a 3-mm jump ring, and another 5-mm jump ring so that there are three jump rings attached to the center hole.

- Polish the heart either in a tumbler or with the rotary tool. (See the Chain making section, page 73, for polishing techniques). If you prefer the pendant polished, skip the last few steps of this project. To give it a patina, which will help the X and O stamping show up a little more, continue.
- Fill two small bowls with water, and microwave one bowl for about 60 seconds. It should be warm, but not boiling.
- Take a small chunk of liver of sulfur, set it in the warm bowl of water, and use tweezers to stir the water a little. It is harmless but will start to smell like rotten eggs, so it is a good idea to work in a well-ventilated area.
- Sprinkle about a tablespoon of baking soda in the other bowl of water.
- Place the heart pendant in the liver of sulfur water, use tweezers to pull it out after a few seconds, and place in the bowl with the water and baking soda. (The baking soda neutralizes the affects of the liver of sulfur.)
- Pull out the pendant, dry it off with a paper towel. If it has the look you want, you are finished. If you want to remove some of the patina, rub it with a polishing cloth. If you want it darker, repeat step 16 until it has the look you desire.
Read NextCross Necklace Kids Craft

